
In 2026, premium smartphones are equipped with 50 to 200 Mpx sensors, computational HDR, and 5-axis optical stabilization. But a good sensor doesn't necessarily make for great real estate photos — and most agents discover this only after publishing their listing.
Poorly mastered smartphone real estate photography remains the number one cause of listings with low click-through rates: overexposed windows, squeezed rooms, overly dark interiors. This guide provides the five essential settings, framing rules to enhance space perception, and AI tools that compensate for the technical limitations of smartphones.
What you will learn in this guide:
- The 5 settings to configure before each real estate photo shoot
- Framing rules to visually enlarge rooms
- How IACrea's AI compensates for backlight and overexposed windows
- The 4 most common mistakes — and how to fix them in 30 seconds
Why smartphones have become the go-to photography tool for real estate agents
A professional tool in every pocket
2025-2026 smartphones have significantly bridged the gap with dedicated cameras for regular real estate photography. Three technological advances explain this shift:
- Computational HDR: automatic merging of 3 to 15 exposures in less than a second, delivering bright interiors without overexposed windows
- Optical stabilization: gyroscope-assisted, reducing motion blur even in low-light conditions
- Ultra-wide-angle lenses (24-26 mm equivalent): now standard on nearly all recent models, allowing small spaces to be captured in a single shot
According to a SeLoger study published in 2024, 78% of real estate listing photos in France are now taken with a smartphone. The debate is no longer “smartphone or dedicated camera?” — but “how to make the most of your existing smartphone?”
When a dedicated camera still has the edge
For luxury properties (over €800,000), double-height architecture, or very dark spaces, a mirrorless or DSLR with a dedicated wide-angle lens (16-24 mm) remains more effective. But for 90% of typical transactions — apartments, houses, standard commercial spaces — a good smartphone combined with AI post-processing delivers highly competitive results. Our comprehensive guide to professional real estate photography details this equipment comparison.
The 5 settings to configure before each real estate photo shoot

1. Activate HDR mode
HDR (High Dynamic Range) is the most crucial setting for smartphone real estate photography. It automatically merges multiple exposures of the same scene to simultaneously render dark areas (interior walls) and very bright areas (windows, outside sky).
On iPhone: Settings → Camera → Auto HDR (enabled by default since iOS 16).
On Android: within the camera app, tap the HDR icon to turn it on, or switch to Pro mode for manual control.
For advanced use, the IACrea real estate photography app automates multi-exposure HDR bracketing directly from your smartphone, with instant synchronization to the web platform.
2. Manually adjust exposure
Even with HDR active, automatic exposure can misjudge scene brightness when facing large windows. Technique: touch the brightest area on your screen (the window or sky) to lock exposure on that zone. The interior will be slightly underexposed — but recoverable in post-processing — rather than burning out the window and ruining the shot.
Most smartphones show an exposure compensation slider next to the focus point. Lower it by one or two stops to safeguard highlights.
3. Enable grid and check verticals
A photo with tilted walls immediately undermines space perception and signals unprofessional shooting. The grid helps align vertical lines (window jambs, wall corners) before pressing the shutter.
On iPhone: Settings → Camera → Grid.
On Android: in camera options → Grid or Guides.
If walls remain slightly tilted despite the grid, correct the perspective in post — the IACrea app and Lightroom Mobile do this with a simple swipe.
4. Stabilize the smartphone
Motion blur is the leading cause of failed interior real estate photos. Three solutions depending on your budget:
- Flexible mini-tripod (€15–25): ideal, adjustable to the exact height needed.
- Table tripod: placed on a piece of furniture at the target height.
- Doorframe technique: in absence of a tripod, brace your elbows against the wall or doorframe before shooting.
Furthermore, use the 2-second timer to prevent micro-movements during shutter release.
5. Choose the right shooting height
The ideal height is 1.20 m to 1.40 m from the floor — roughly chest-height, not eye level. Too high and the camera produces downward-looking angles that shrink the space visually. Too low and furniture and floor imperfections are exaggerated.
This height mirrors the natural perception of an buyer entering the space — exactly what you want to reproduce in your listing.
Framing and composition: rules to enhance space perception
Always shoot from a corner of the room
Never face a wall head-on: position yourself at the corner of the room to capture two walls simultaneously. This perspective creates depth and helps the buyer gauge the actual proportions of the space.
Showcase connections between rooms
Photograph from the hallway to include the living room in the background, or from the kitchen to reveal an open-plan layout. These “staircase” framings highlight circulation flow and perceived size — crucial factors in the decision to visit.
Anticipate light sources
Generally, turn your back to the windows to avoid dark silhouette effects. If the room’s orientation requires facing a window — common in kitchens or north-facing bedrooms — activate HDR and slightly increase exposure compensation.
Enhance your smartphone photos with AI
Before and after: the real impact of HDR on a smartphone shot
See how the same smartphone, in the same room, looks without and with HDR processing via the IACrea app:
Without HDR: the interior is dark, the window is completely blown out — unusable for a listing.
With HDR AI: interior and exterior properly exposed, natural light preserved — even with a smartphone.
The IACrea workflow from the field
The IACrea photo app (iOS) captures 3 to 5 bracketed exposures in rapid succession, automatically merges them into HDR, and synchronizes the processed images with the web platform — ready to publish to listing portals without a computer. The full guide to the IACrea photo app details this mobile workflow.
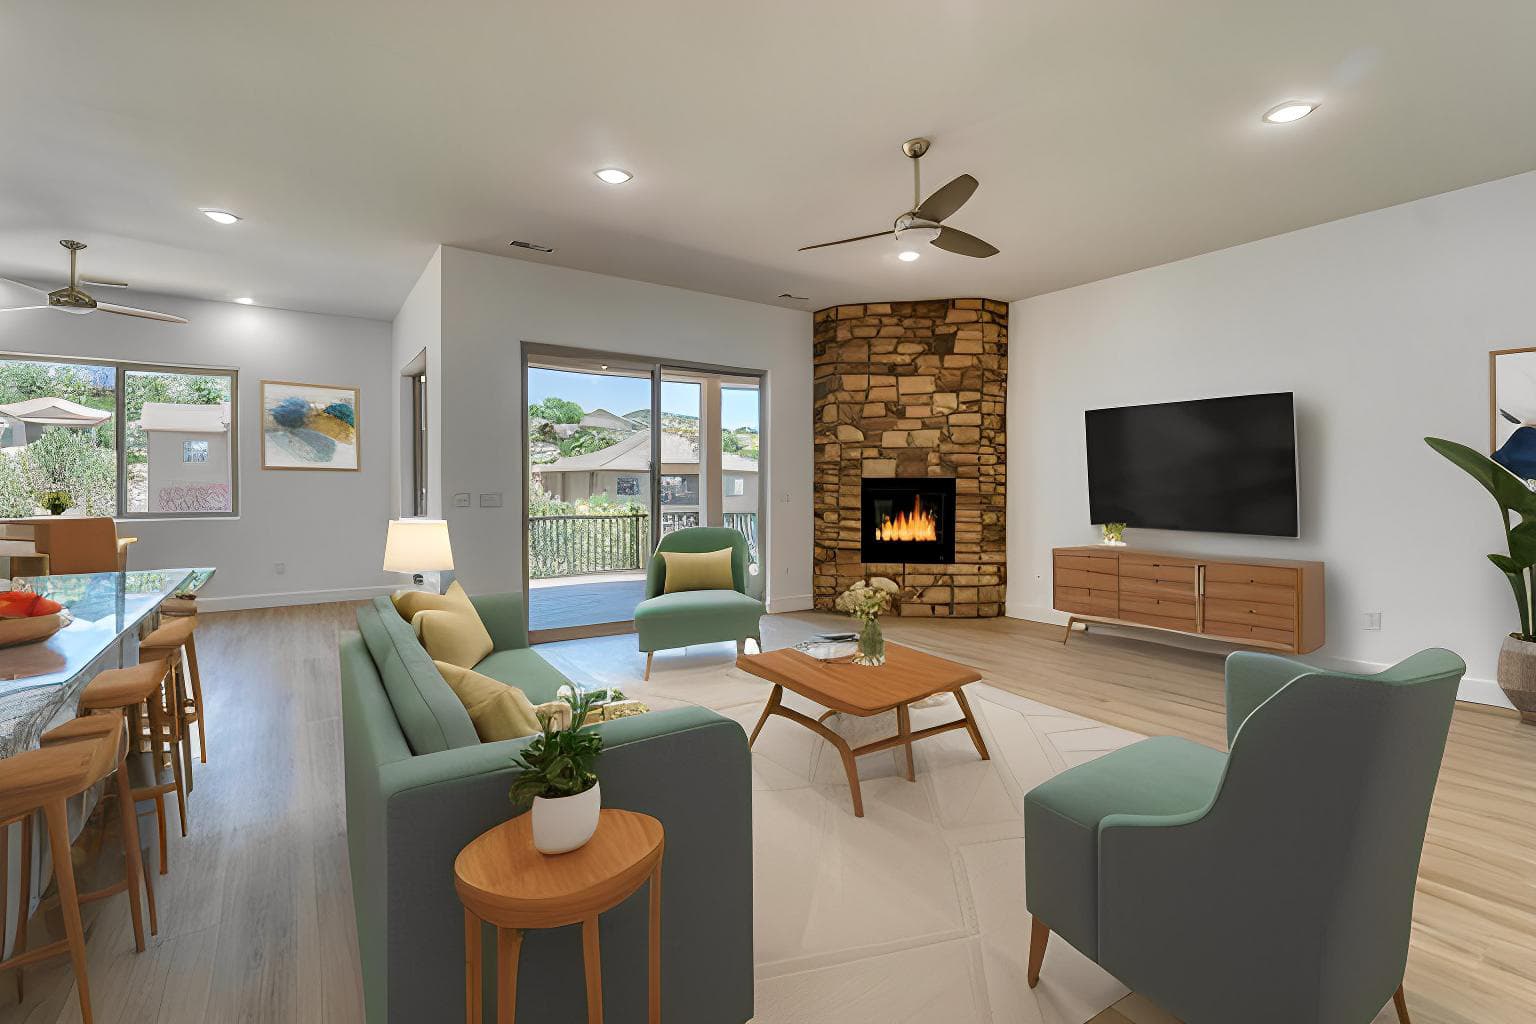
Virtual staging on smartphone photos
A well-exposed photo taken with your smartphone is fully compatible with IACrea's virtual staging tools — provided the resolution exceeds 1,200 × 900 pixels, which most recent smartphones easily deliver. If the property is empty or poorly furnished, virtual staging generates a furnished version in seconds. Check out our before/after examples to see the true impact on real property photos.
The 4 most common mistakes — and how to fix them
| Mistake | Effect | Solution |
|---|---|---|
| Overexposed windows | Unrecoverable highlights | Enable HDR + tap the window to lock exposure |
| Smartphone tilted | Walls appear slanted, room looks skewed | Enable grid, correct verticals before shooting |
| Dark photos | Unattractive, visitors pass by | Night mode or tripod + manual ISO |
| Too high shot | Space looks compressed | Lower to about 1.20 m — use a mini-tripod or steady hand |
One last pitfall shows up after the shoot: the iPhone saves photos in HEIC format by default — rejected by Leboncoin — and files often exceed portals' weight limits. Before publishing, our free HEIC to JPEG converter and photo compressor with Leboncoin and SeLoger presets fix both issues in one click, directly in your browser, with no sign-up required.
FAQ
Can a smartphone really replace a camera for real estate photos?
For most standard properties, yes. The 2025-2026 smartphones offer computational HDR, optical stabilization, and resolutions (50-200 Mpx) sufficient for high-quality listings. Limitations are fixed focal wide-angle lenses and lower performance in low light — where dedicated DSLR or mirrorless cameras still have an advantage. Paired with AI (HDR processing, virtual staging), a good smartphone covers 90% of an agent’s needs.
What settings should I use when photographing an apartment with a smartphone?
Activate HDR (or let the smart auto mode handle it), manually adjust exposure by touching the brightest area to prevent window overexposure, enable the grid to align verticals, and use a tripod to prevent blur. In low light, switch to night mode if available.
How do I avoid overexposed windows using a smartphone?
Tap on the window on your screen to lock focus and exposure on that area — interior will be slightly underexposed but recoverable. The most effective method is using the IACrea app, which automates exposure bracketing (HDR), merging multiple shots to balance interior and exterior lighting in one image.
Is a tripod necessary when photographing with a smartphone?
Highly recommended. A tripod allows longer exposures in low light without blur, maintains consistent shooting height (~1.20 m), and frees your hands for composition. Compact flexible tripods (around €15–20) are perfectly suited for typical real estate use.
What height should I shoot from when photographing a room with my smartphone?
The ideal height is about 1.20 m to 1.40 m from the ground — roughly chest level, not eye height. Too high creates downward angles that make the space look smaller; too low exaggerates furniture and floor imperfections. This height reflects how an buyer naturally perceives the room, exactly what you want to convey in your listing.
Conclusion
Photographing a property with your smartphone isn't improvised — but it can be mastered in a single session. By mastering five key settings (HDR, manual exposure, grid, stabilization, height) and coupling your shots with the IACrea photo app for automatic HDR processing, you publish listings with visuals that surpass most competitors.
Check out our IACrea pricing and test the app on your next mandate — the difference is visible from the very first room.
Related articles

Ready to turn your photos into content that sells?
Join thousands of real estate agents using IACrea to create professional content in seconds.
Try for free →